
Growing Koji
What is Koji ?
Koji is a broad term to determine fermented food made with the domesticated fungi Aspergillus Oryzae. This particular fungi has been domesticated by humans for consumption for over 3000 years. This particular fungi grows on cereal in hot and humid climate. The enzyme of the koji decomposes the starch of the cereal and transforms its taste into a sweet and umami flavour.
Ingredients :
500g Barley (you can use any grains you like but barley works very well in my experience)
Koji Spores
What you will need :
DIY Incubator
Perforated Container
Clean Cotton Cloth
Water Spray
Steps to Follow :
Let soak barley overnight.
Steam cook barley until soft but not mushy.
Make sure to clean your utensils and to clean your hands or use gloves to handle the grains.
Place the cloth on the container and lay out the barley to cool down.
Once it has cooled down to room temperature, scatter half a teaspoon of Koji Spores as evenly as possible over the barley.
Place in Incubator - Koji thrives at 30 degrees and 70% humidity so spray the cloth regularly and place a small container with water inside the incubator.
After 24 hours, the koji will need to be mixed by hand, use gloves or clean hands to do so.
After 48 hours, you should be able to smell a fruitiness emanating from the Incubator, on the barley you should be able to see spores on the surface.
It is time to take out the koji !
Carefully take out the koji and place it in the fridge or the freezer if you want to save some for later use.
You can consume your koji in many different ways ! Fried is a lovely way to enjoy some protein with a vegan meal.
Growing Tempeh
What is Tempeh ?
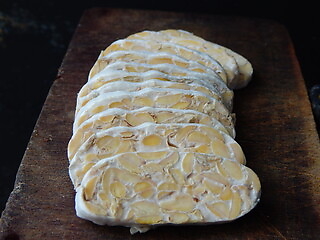
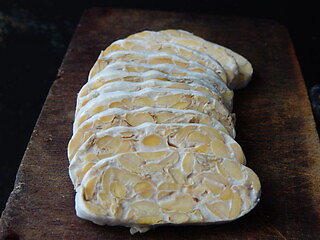
Tempeh is a ferment made from soya beans and the fungi Rhizopus oligosporus or Rhizopus oryzae. It is thought to have originated from Java in Indonesia. Similarly to koji, the fungi grows on the beans to form a sort of cake. This cake is a great source of protein for vegan or vegetarians !
Ingredients :
500g Soy Beans (you can use any grains or legumes you prefer for Tempeh)
Tempeh Starter
Small teaspoon of Vinegar
What you will need:
DIY Incubator
Zip-lock bag
Tempeh Starter
Steps to Follow :
Pour boiling water over the beans and soak overnight.
Cook the beans for about 45 minutes until soft but not mushy.
You need the beans to keep their shape for the oxygen to circulate between them and the mycelium to grow.
Hull and split the beans with clean hands.
Let the beans dry out on a paper towel.
Let the beans cool down below 30 degrees to make sure you do not kill your starter, they should still feel warm when you wrap them up for incubation.
Place the beans into the ziplock bag with a teaspoon of Tempeh Starter and stir thoroughly.
Make sure to poke lots of holes in the bag for the fungi to breathe.
You can add a small teaspoon of vinegar, this has been reported to avoid other contamination but it may alter the taste of you tempeh slightly.
Let incubate at 30 degrees for 24 hours. Check at 12 hours that the mycelium has started to grow.
Tempeh is considered ripe when a few black spots, indicating sporulation begin to grow.
After 48 hours, take out the tempeh, it is ready !
You can chop it up and add it to your stews, curry or simply fry it ! It is also delicious if you marinate it over night.